
Eclipse Autoupdate.
Eclipse 2.3 introduced the facility for auto-updates. This means that when Navigator Systems Ltd release an update to Eclipse or one of it's supporting programs, you will receive a notification and be offered the opportunity to update your program.
The auto update facility is configured for all users in the configuration utility on the rules page.

There are three auto-update options available.
1 No notification of updates - Eclipse will not check to see if there is an updated version of the program.
2. Auto-update from Navigator FTP site - Eclipse will try and contact the Navigator ftp site (ftp.navigator.co.uk) on startup, if there is a new version, then a dialog will be displayed inviting the user to upgrade. To download and install the upgrade the user has to select the Help / Check for new version menu, which will run the upgrade wizard. Note that for this option to work successfully your firewall must have been configured correctly to allow ftp access to our site.
3. Auto-update from a central location on your network. - Eclipse will check a directory (New version location) on your network for an update. If it finds one, then a dialog will be displayed inviting the user to upgrade. To download and install the upgrade the user has to select the Help / Check for new version menu, which will run the upgrade wizard.
The updates can be downloaded manually from our ftp site by the administrator (not recommended) and placed in an update directory (New version location) on your server or alternatively the Navigator Auto-update service can be installed which will automatically do this for you (as well as emailing the administrator once this has been done).
If downloading manually, the update files can be downloaded from ftp://ftp.navigator.co.uk/pub/eclipse_auto_updates/ all files should be downloaded.
Many administrators wish to download the updates automatically to their server and be informed of these updates, but hold back on rolling the update out to the users until a convenient time. Once the autoupdate service has been configured correctly (see below), the configuration book can be set to No notification of updates. In this situation the updates will be downloaded correctly to the New version location folder and the administrator will be emailed with the details of the updates, but Eclipse will NOT inform the users that there is an update available. When ready the Administrator can either set the Eclipse updates notification to Auto-update from a central location on your network, so that the users will be informed of the update the next time they start Eclipse or they can manually extract the update from the downloaded CAB files and distribute them to the users' PC either manually or by using a third party program.
To use the Auto-update service.
The auto update service will not run on a Windows 95 or 98 PC.
It is recommended that the autoupdate service is installed on the same PC as the Eclipse database, but this is not essential as long as this server has access to the database server. The server running the autoupdate service does NOT require the BDE to be installed (but it can be).
Firstly configure Eclipse correctly.
1. Open the configuration utility and navigate to the Rules page.
- Set the Eclipse updates notification to Auto-update from a central location on your network.
- Set the New version location to the path of the folder you wish the workstations to check for an upgrade. This is the path as the Eclipse workstations see it and can be a UNC path or a mapped drive letter.
- Set the Administrator email to your email address.
- Set the SMPT server, port, Authentication type, user name and password as appropriate for your Network. You may need to talk to your ISP to find the correct settings. Pressing the Save & test email button will send a test email to you. The test email will come from the Test Email Sender - you may change this is required.
- Press the
 button at the top of the page to save your changes.
 - In Windows explorer, Browse to the NETDIR folder and verify that the file paths.ini exists.
To install and configure the autoupdate service.
1. Download the autoupdate service install from ftp://ftp.navigator.co.uk/pub/eclipse/autoupdate_service.exe to the server (the install must be run on the autoupdate server PC).
2. Run the autoupdate_service program, accept the license conditions and select a directory to install it to.
3. If this machine is the Eclipse file server, then when prompted let the software search for the NETDIR folder. If however the data is on a different PC, then manually browse for the NETDIR folder.
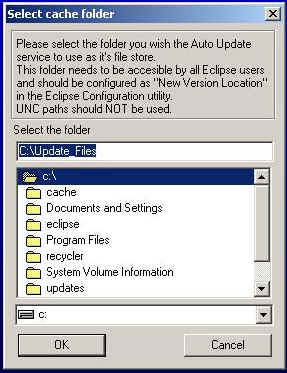
4. When the Select cache folder dialog pops up, set this to the same folder as that pointed to by the (New version location) setting in the configuration book. This must NOT be a UNC path i,.e it must have a drive letter and is the path relative to the server.
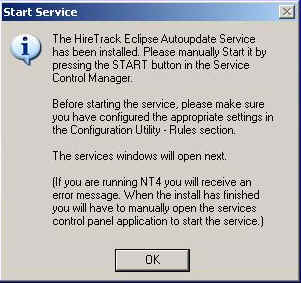
5. Once selected the Service Installed correctly message box should be displayed. Click Ok on this
6. Next the Start services dialog will be displayed. Clicking OK will open the services control panel.
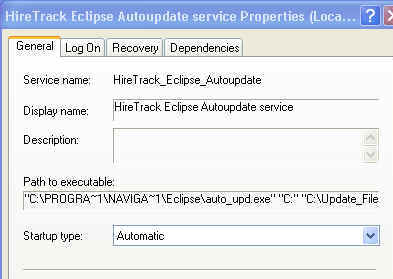
7. Verify that the HireTrack Eclipse Autoupdate service is installed.
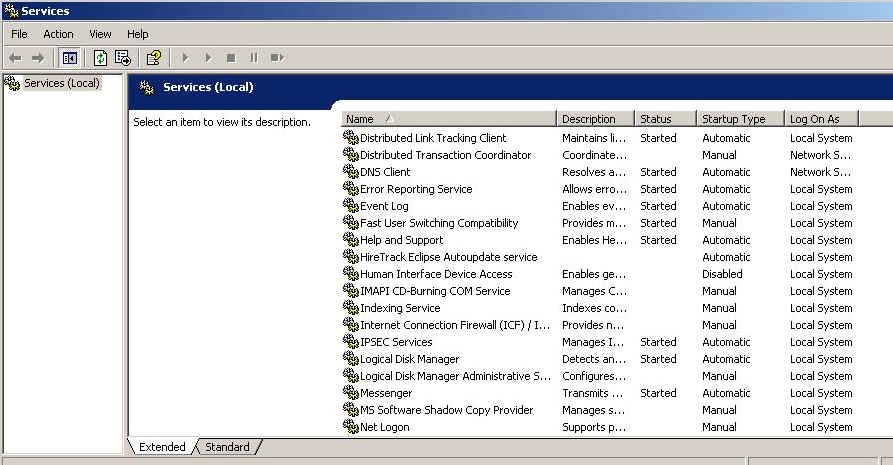
8. Right click on the HireTrack Eclipse Autoupdate service and select properties. The path to executable should display the short filename version of the path you installed the program to (in double quotes " ) followed by the path to the NETDIR from the servers perspective and finally the path selected in point 4 above.
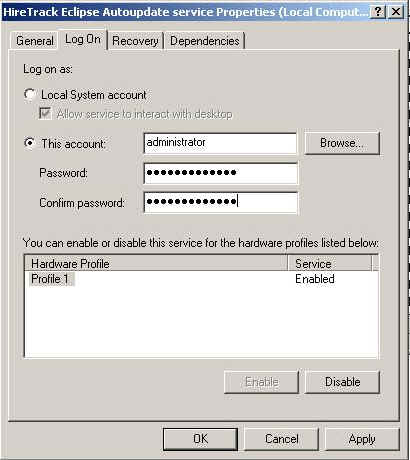
9. Change to the Log on page. This will have the Log on as: set to Local System Account. This will NOT work as this account has no network access rights.
Click on the This account radio button and select a user who has FULL access rights to the directory set in point 4. They will also need FULL access rights to the directory the auto update program has been installed into. Set the password and press apply. Change back to the General page and press the Start button and then press OK. Provided you set a valid username and password, you should be returned to the services page and the status column will now display Started .
10. In Windows explorer navigate to the directory that you installed the auto update program into. After approximately one minute a subfolder called CACHE should appear along with a file old_ftpdir.txt. If you don't see them, try pressing F5 on your keyboard to refresh the display.
11. Open the cache folder and you should see it slowly fill with the files downloaded from the Navigator ftp site.
Note: If you use a proxy server to access the web then see below.
12. Once all the files have been downloaded, the auto update program will create the folder selected in point 4 above, if it doesn't already exist and will then copy the new files from the cache folder to the New version location folder (Obviously the first time the auto update is run, all files will be copied).
13. To see the progress of the Autoupdate service at any time, open the Windows control panel, select Administrative tools and then select the Event Viewer. The Autoupdate service will record it's progress (together with any problems) to the Application page of the Event Viewer.
Using the Autoupdate Service with a proxy server.
To use the autoupdate service with a proxy server
- Create a text file called auto_upd.ini in the folder you installed the update program in to. If you have renamed the program to something other than auto_upd.exe then the ini file will have to be renamed too. (i.e the program and ini file must have the same name (excpeting the extension)).
- Open the ini file in an editor, such as notepad.
- Add a section called [FTP] (include the []).
- Add any of these settings with their values as required.
i.e replace value_for_your_network with the value your Network Admin has given you.
If any of the settings should be empty or not used, then don't add those lines into the file
.
port=ftp_port_value_for_your_network
proxyserver=proxyserver_address_or_name_value_for_your_network
socksport=port_used_by_socks_value_for_your_network
sockspassword=password_used_by_socks_value_for_your_network
socksserver=socks_server_address_value_for_your_network
socksusercode=socks_usercode_value_for_your_network
- Restart the service. If the ini file is found by the service, then event log will contain the line
Eclipse Autoupdate Service - reding alternative FTP settings [sic]
Un-installing and removing the Autoupdate service.
To uninstall any Windows service requires a few manual steps.
NOTE You can not reinstall the autoupdate service over the top of an existing copy without first following these instructions.
- Open the Services control panel application.
2. Find the HireTrack Eclipse Autoupdate service, right click on it and select Stop. Verify that the service has stopped. (the status field will be empty).
3. Right click on the service and select properties.
4. Make a note of the Path to executable. In the above case it's c:\progra~1\naviga~1\eclipse\auto_upd.exe
5. Close the properties window and then close the services window. It is VERY important that these windows are closed before proceeding.
6. Click Start / Run and type CMD and press OK
7. A command window will open.
8. Type the drive letter at the start of the Path written down in step 4. In this case I'd type c: and then press enter. Don't add a \ to the end, but do remember the :
9. Type cd and then the full path to the file written down in 4. Don't include the drive details or the application name. In this case I'd type
cd \progra~1\naviga~1\eclipse and then press enter.
10. Now type the application name followed by a space and then -uninstall e.g
auto_upd -uninstall
Windows should report that the service has been sucessfully uninstalled.
11. Reboot the PC.
12. Open the Services control panel and confirm that the autoupdate service is no longer listed.
Comments
0 comments
Please sign in to leave a comment.