
Workflow Automation Definition
Workflow Automation refers to the design, execution, and automation of processes based on workflow rules where human tasks, data or files are routed between people or systems based on pre-defined business rules.
Why Workflow Automation Is Used
By automating workflows, especially those processes that are primarily handled manually by employees, significant improvements can be made in:
- Efficiency
- Productivity
- Accuracy
- Audibility
- Accountability
- Job Satisfaction
How to Build an Automated Workflow
Using a drag and drop interface to add and arrange tasks, automated workflows can be planned and designed visually to either simulate or improve upon existing processes. In most cases, the process is illustrated in a static format and reviewed by all stakeholders for accuracy.
A workflow in HireTrack NX can be considered to be a set of instructions or inputs that accept data or direct flow control that are presented to the user to perform a specific task.
The workflow can be one of several different types
- A set of instructions for the user
- Information gathering
- Queryable Data input
HireTrack NX workflows can also push data via Zapier to over 2,000 other applications (https://zapier.com/explore).
Workflow Automation Examples
Here are some examples of processes that can benefit from optimization using workflow automation software:
Simple or Complex Workflows Can Be Automated
The automation of a given workflow process can involve one simple request/approval process or encompass several different workflow tasks and resources, triggered by set business rules. 1. Set of Instructions - walking a user through checking a piece of equipment to confirm that it was fully operational.
Something like this could be represented by a flow chart thus:
- Information gathering - this would be something like a pre-quote checklist or an on-site recce.
This could also be used to generate risk assessments by asking appropriate questions to ascertain risk. For example, the mitigation required for a covid safe environment
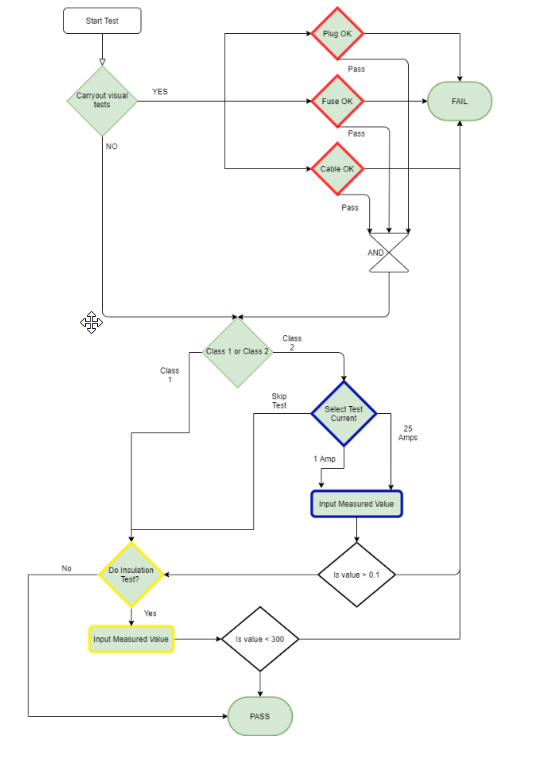
- Data Input - this would be something like an electrical safety test. There is both a requirement to walk the user through the correct testing path e.g Class 1 or CLass 2 equipment but also to collect those responses along with data measured by the user, which can later be queried via the QBE designer or Report engine.
This could be presented as a flow chart thus:
Definitions
Before we move on to how to create a Workflow or Automation, there are a number of key terms that need to be understood.
Workflow. A workflow is the whole system from start to finish. The three examples above are all workflows.
Each workflow is a collection of pages. The flow through a workflow is determined by the score generated by each page.
Page - a page is a collection of inputs or outputs for the user. All inputs & outputs on a page will be displayed to the user at once.
Each input can generate a score and the sum of those scores is the page score.
Header - a header is a piece of text presented to the user in an emphasised style. It is usually used to indicate a change in the group of Inputs & Outputs. A header doesn’t affect the scoring of a page.
Narrative Output - a piece of text presented to the user. Normally an instructive piece e.g Using the RS PRO IM720 light meter, measure the light output 30cm from the front of the lens
Image Output - an image presented to the user. Normally an accompaniment to a narrative piece.
User Input - a way of collecting data from the user. The user input accepts data in one of a predetermined format.
These are
Short Text - a line of text can be entered.
Long Text - many lines of text can be entered
Number (Whole) - an integer can be entered (no decimal parts)
Number (Decimal) - a floating number can entered (including decimals)
Currency - a number formatted to the user’s currency.
Date - a date
DateTime - a date and time pair
Time - a time
Image/Photo - an image or photo.
Yes/No Option. User input can only be one of two values.
Picklist - a predetermined selection of answers where the user can choose one response.
Overview
The workflow designer is located on the Data Management Tab within HireTrack NX
Controls
Working through the Workflow Designer
 - the name of the current workflow being designed
 - info on this workflow, such as who created it and when
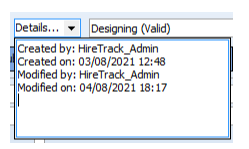
 - the status of the workflow - whether the current design is valid or whether it has dangling (unconnected) pages or stages.

Save the current workflow
Cancel the recent changes (reloads the last saved copy)
Delete the current workflow - this can’t be undone.
Publish - once the workflow has been designed and tested, publishing it makes it available for use.
Clone - creates a copy of the current workflow
Rename - renames the current workflow
Export - saves the workflow in an external file
Import - imports a workflow from an external file.
 - Classifies the Workflow, enabling context specific features; for example, choosing "Equipment" will allow the designer to target specific equipment types to run a Workflow against.
 - 'Specify, in context of the Workflow Type, what areas the Workflow should target e.g. Equipment Types or Barcoded Equipment.
NOTE: Targets are assigned in the appropriate books for the Work flow Type, e.g. the Inventory or Testing Book for "Equipment"
 - specifies which forms the user can launch this workflow
 - Some workflows do not need to be saved once they have been run; for example a Repair Book Workflow may just walk a user through a diagnostic flowchart. If no inputs are made available for the user and "Auto-Decide" set then HireTrack NX will NOT save the Workflow instance that is run.
 - Workflows and their instances are stored in special text base notation called JSON. This has many advantages but is not compatible with the Report Designer nor QBE engine in HireTrack NX; so if there is a need to display or analyse the data entered by users this data will need to be recorded in an additional conventional database table.
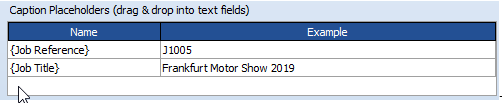 - There may be a need to display information to the user about the current context for example a Barcode or Equipment Type Name or the Job Title. Drag from this grid into a text field to create a "placeholder" that will be replaced with real 'data when the Workflow runs
WorkFlow Designer
Workflow Designer - this shows the pages in the workflow and how they link to each other.
 - Dragging the blue page icon on to the Workflow designer will create a new page. Dragging the icon on top of an exing page will automatically create a link from the destination page to the new page.
 - 'Sets the type of object that has been created in one of the designers e.g "Page".
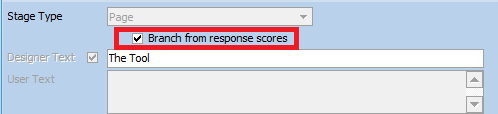
Branch from response scored - 'The data entered by users affects what is next presented to them then you need to enable "Branching" for a Page. 'Branches allow the "scores" of users' responses to apply logic that determines if, say, Page 2 or Page 3 is shown next. Branching logic uses the scores for all stages that are on a Page.
 - Every page can be associated with a QBE that updates the HireTrack NX database. For example, you may devise a lamp examination Workflow and if it fails have the Workflow create a new Repair Book entry.
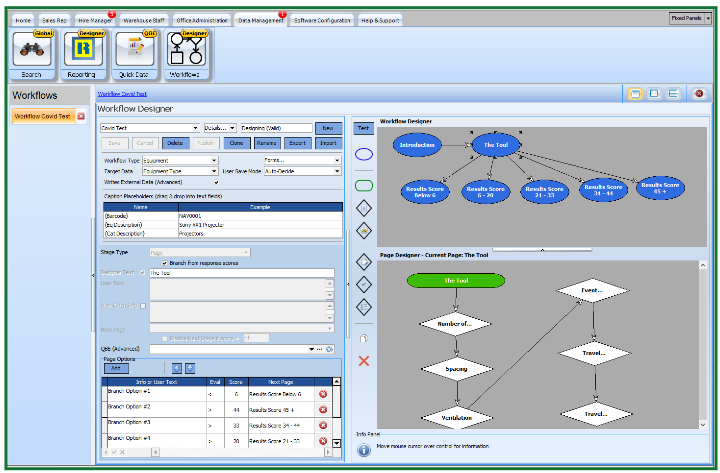
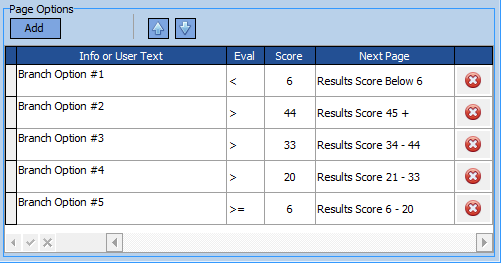
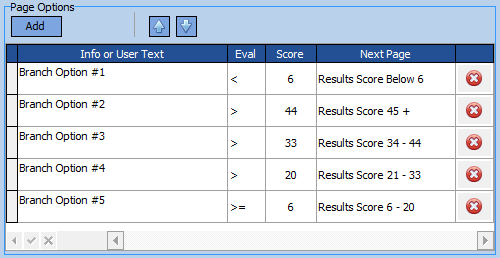 - The score/branch assignment. This is used to determine which page is presented next to the user dependent on what the current page has scored. The scores are evaluated starting from the top of the page and working down. When the first match is met, no further evaluations are carried out. In the example pictured, if the score was 37, the < 6 test would fail, the score > 44 test would fail but the score > 33 test would pass and the [age branch would be set to the page Results Score 34 - 44. The evaluation would be aborted at this point, so the > 20 & >= 6 would not be evaluated. The Arrow buttons allow the evaluation order of the scores to be changed.
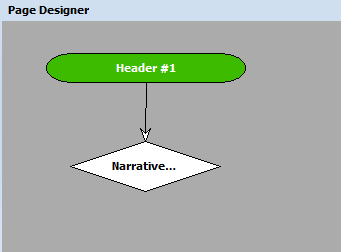
Page Designer
The page designer is used to design the flow of controls within a single page. All the controls on a page are displayed to the user at once, however it is possible to disable controls until a previous control has been actioned.
Dragging any of these icons on to the pages designer will add a new step to the page. Dropping an icon on to an existing icon will create a link between the destination and the new icon.
 - Header - displays text in a highlighted way. Normally the title of a page.
 - Narrative Output - text that the workflow designer wishes to present to the user - normally instructions.
 - Image Output - an image that the workflow designer wishes to present to the user - for example where to attach a test probe.
 - User input - Prompts the user for input, this could be text, number or an image.
 - Yes/No input. Prompts the user for a Yes/No input. Usually a checkbox, but can also present two radio buttons.
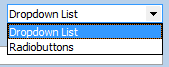
 - Picklist - Prompts the user to select a value from a list of predefined values. Can be presented as a drop down list or a series of radio buttons.
 - duplicate - duplicates the current selected control (not Pages).

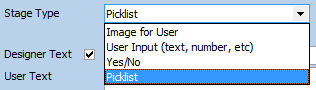
Sets the type of control you have created in one of the designers: "Header", "Narrative For User", "Image for User", "User Input (text, number, etc)", "Yes/No", "Picklist", with a modifier to further define the type of input e.g "Short Text", "LongText", "Number (whole)", "Number (decimal)", "Currency", "Date", "DateTime", "Time", "Image/Photo
 - This modifier presents a control in a read only mode, set with a default value. This allows score dependent data like "Pass = True" to be recorded in the external data table.
 - some text to be displayed in the design flowchart to help the workflow designer.
 - the information that will be presented to the user running the workflow.
 - optional additional information for the user - normally used for a fuller explanation.
 - For Pages this is only specified if the page is non branching; for controls on a page then this specifies the order in which controls are presented on a Page.
 - Allows the workflow designer to disable a step if a previous step isn't addressed; for example a "Venue Curfew Time" data entry may be disabled until a "Venue has Curfew" checkbox is ticked.
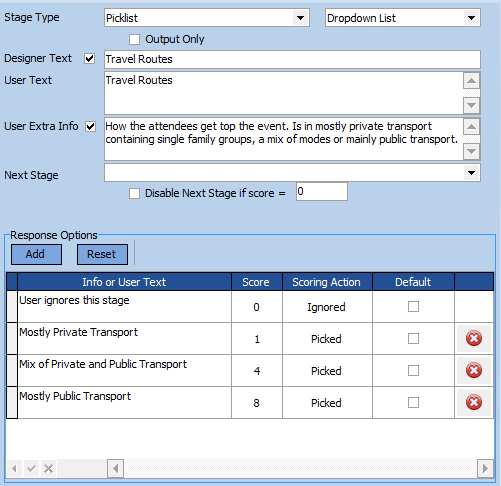
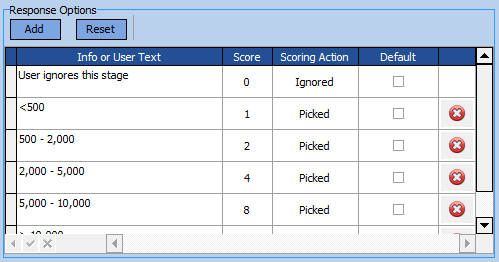 - response options - depending on the Stage Type, the user may be presented with a choice of responses. This example shows a Dropdown list, the Info column displaying the text that will appear in the dropdown list and the Score column showing what score will be assigned to each particular choice. E.g if the user picks the option 5,000 - 10,000, then the score will be incremented by 8.
 - deletes the current selected Page or Control. This can’t be undone.
 - Displays useful information to the workflow designer.
Creating a new Workflow.
Open the Workflows page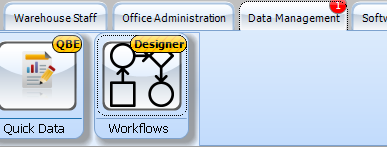
Click on New button
Give the Workflow a Name
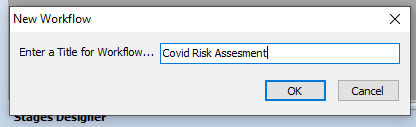
Select a Workflow Type - for this example Jobs.
The Workflow type is used to determine what data is available to the workflow, so for example a workflow type of Jobs, will allow the workflow access to the Job Reference and Job Title.
For some workflow types, the Target Data also should be set. The Target data describes which entity the Workflow is going to be run against. For example a workflow that walked a user through servicing of a Mac 250 moving light, would require a workflow type of Equipment, and a Target Data of Equipment Type i.e the workflow is going to be run against a type of equipment, and any data the user enters will be stored against that type. Compared to an Amplifier Test where again the workflow type will be Equipment, but this time we want to store the user entered data against each specific item, so in this instance the Target Data will be Barcode.
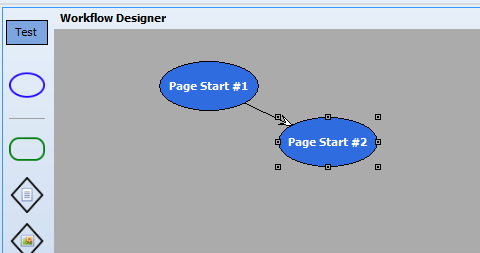
Click and drag the Page icon on to the Workflow Designer.
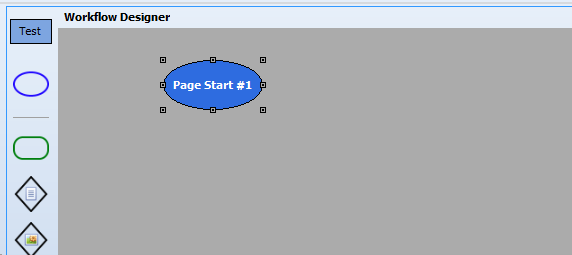
Then repeat, dropping the page onto the existing page (once dropped drag to the side)
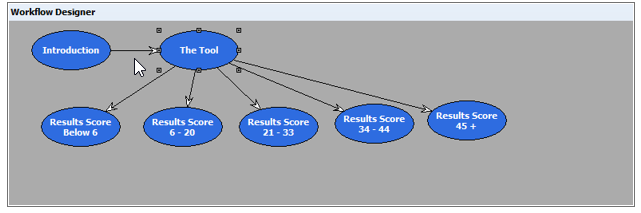
Finally drag and drop five more pages on to the Workflow designer. As the drag & drop will only allow one page to be autolinked, they can just be dropped below.
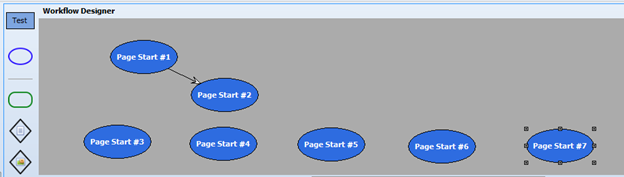
Next Click on Page Start #1 and in the Designer Text Field Change “Page Start #1” to “Introduction”


Repeat for the other pages, changing
Page Start #2 - The Tool
Page Start #3 - Results Score Below 6
Page Start #4 - Results Score 6 -20
Page Start #5 - Results Score 21 - 33
Page Start #6 - Results Score 34 - 44
Page Start #7 - Results Score 45+
So we’ll end up with something like this
Next we want to complete each Page.
The Introduction page is to give the user an overview of the workflow.
To create this we click on the Introduction Page and then in the Page Designer panel, we drag on a header  and an output narrative.
For the Header we want to give it the Title Overview. So that gets set as the User Text

And for the Narrative stage the text:
“Where the number of mass attendance events grows as the nations of the UK come out of their various lockdown arrangements, a need has been identified to assess the risk of those events and ensure that appropriate mitigations are in place. To make this simpler and consistent the following tool is proposed. It works in a similar manner to the risk assessment tool in the ‘Purple Guide’ for managing safety at crowd events.”
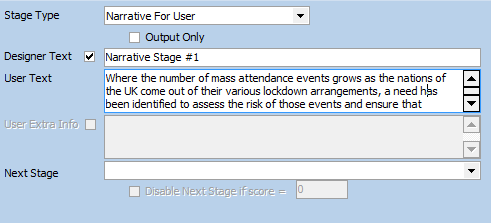
Note how the header stage shows the Narrative Stage #1 in the “Next Stage” field - this is to ensure that the layout when presented to the user is in the correct order.
Press Save, clicking OK on the warning that reminds us that there are unfinished pages
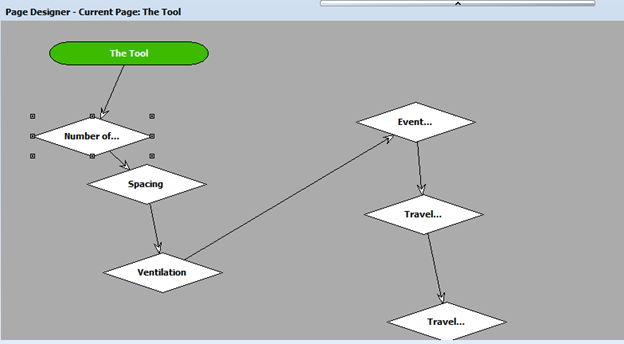
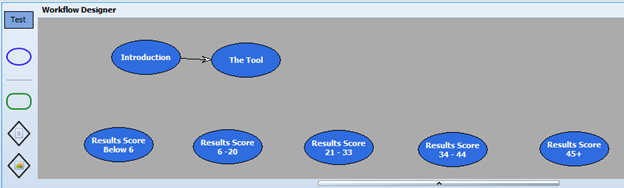
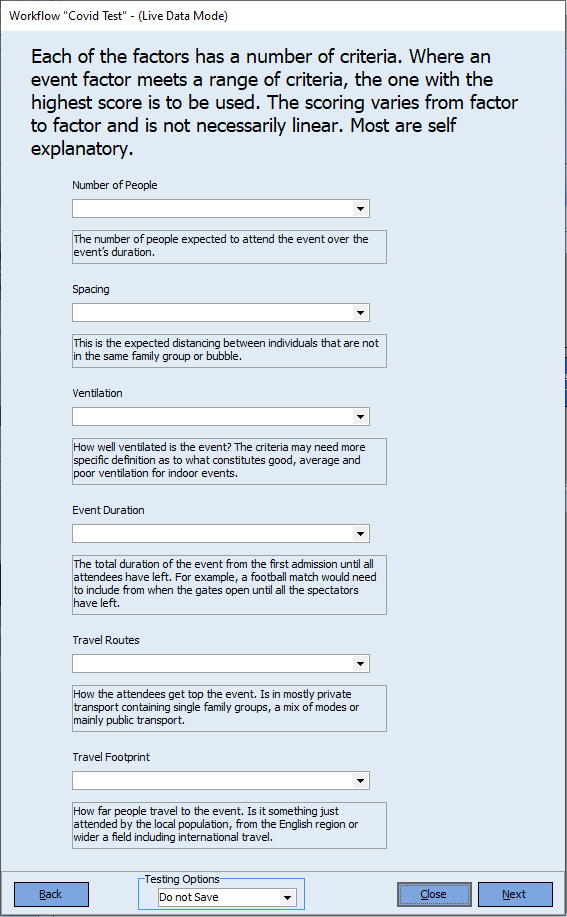
Next click on the “The Tool” page - this is where we’re going to do most of the work.
For the Tool Page we need to add a Header and six Picklist options, thus
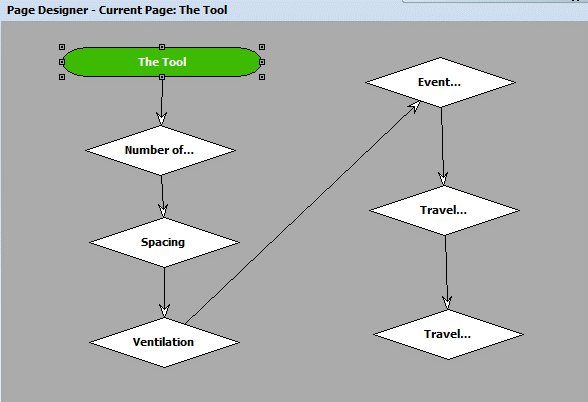
The header has been named The Tool and the picklist options
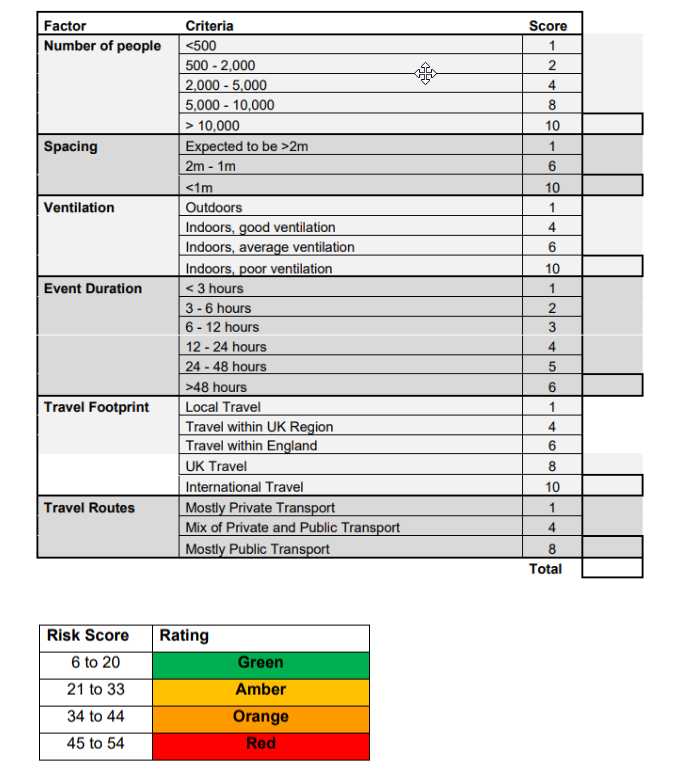
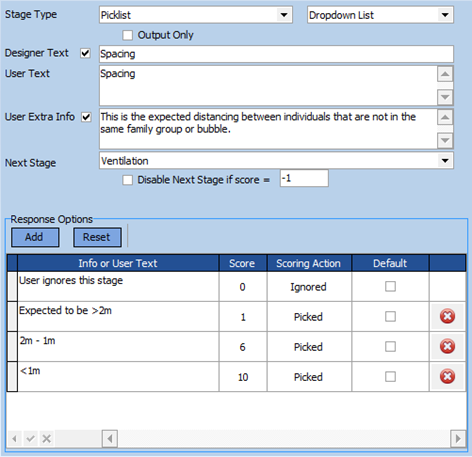
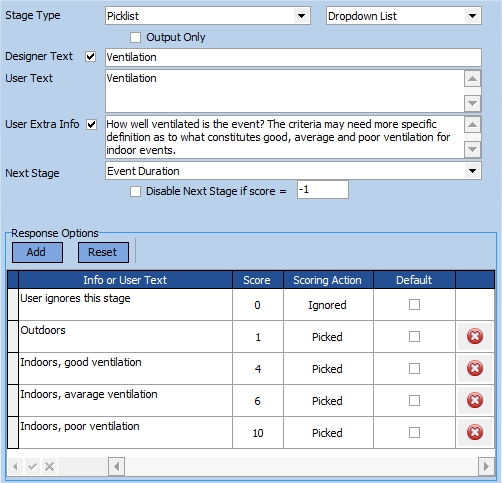
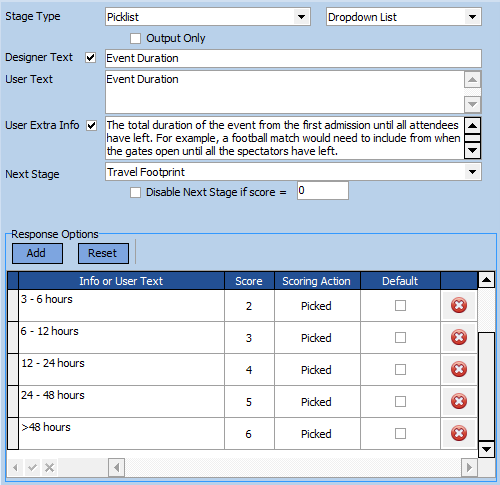
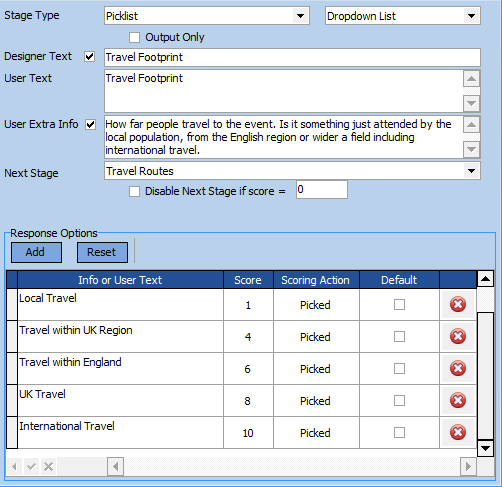
Number of People, Spacing, Ventilation, Event Duration, Travel Footprint & Travel Routes
For each picklist option we’re going to enter some User Extra Info, to help the user use the Workflow and we’re going to enter the possible responses and what score each response should contribute to the overall Page score.
The six stages are shown below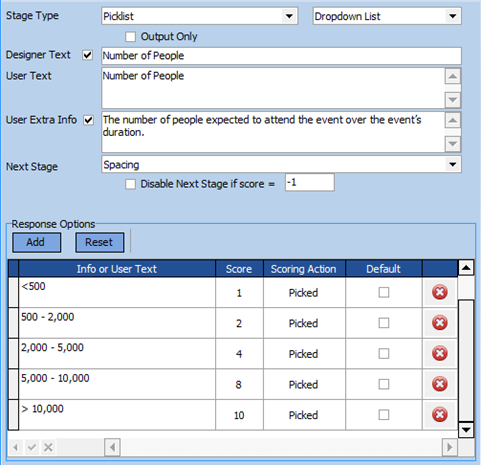
Once all the stages are complete. Save the workflow.
Next click on the Result’s pages, one by one, and add a header to each page and output narrative to each page, with the following information
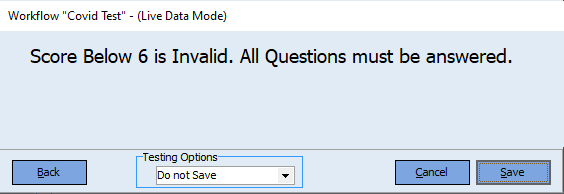
Results Score Below 6 - Not enough questions answered.
Results Score 6 - 20 - Low Risk “Green”- proceed
Results Score 21 - 33 - Medium Risk “Yellow”- proceed with caution
Results Score 34 - 44 - Medium High Risk “Orange” - review mitigations.
Results Score 45+ - High Risk “Red” - review mitigations
Finally we need to configure which page is displayed depending on the score.
Click on “The Tool” page
Check the Branch from response scores checkbox

Press the Add button five times, to create five branch options.
And then complete the grid thus
This tells the workflow to calculate the score at the end of this page and then display the next page depending on the above. The rows are evaluated from top to bottom and the evaluation stops when the first True condition occurs.
Save and our workflow is complete.
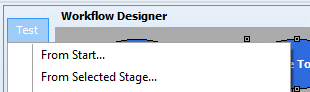
To test that the workflow does what we want, click the Test button and Select “From Start…”
The workflow will now be loaded and presented to the designer as if they were a user running an instance of the workflow.
The first page will display the introduction. Press Next and the main “The Tool” page will be displayed.
If no responses are completed, then the user will score zero and clicking next will display the Score below 6 page.
Click back and complete all the responses

And the response a user would have received will be displayed

Once we’re happy that the Workflow does what we require, we can use the Publish button to make it available to our users.
Assigning a Workflow.
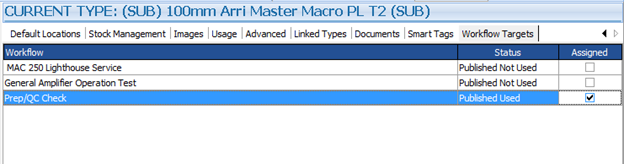
Some workflows, especially ones which target equipment need to be assigned to specific equipment - no one wants to see a workflow walking a user through the serving of a MAC250 appearing against a Sure SM58 Microphone.
Assigning a Workflow can be carried out either in the testing book or the Inventory book.
Here the Pep/QC Check workflow has been assigned to the 100mm Arri Master Macro
Running the Workflow
There are two ways to run a workflow and to view the results, depending on the context.
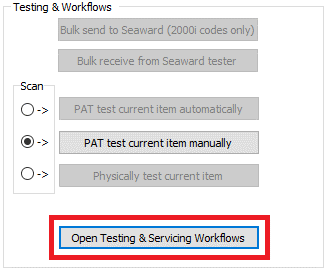
From the Testing & Servicing book, the workflows are launched via a button
In other areas, such as the Job Book, the workflows are available from a Tab.
In either instance the next form that is launched allows the user to run a workflow.
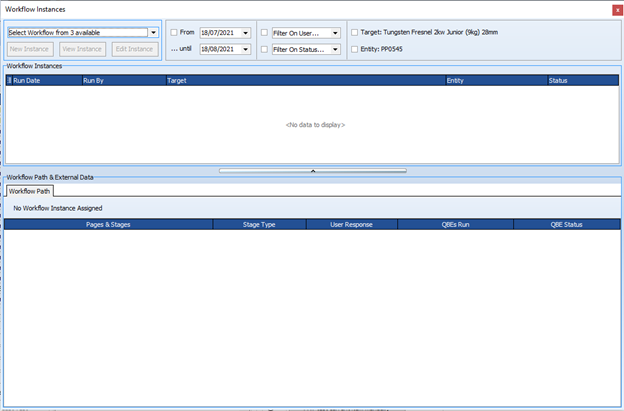
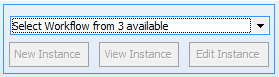
The dropdown top left is where the user will select the Workflows they want to run. If there’s only one workflow available for this Target, then that will be loaded automatically.
In our scenario there are 3 workflow templates available for this Target
Selecting a Workflow will load all the instances of that workflow that are relevant for the Target - in this case the Workflow has a Target of “MAC 250 Entour”, so all the instances of the specific workflow run on “MAC 250 Entour” will be displayed. The filter checkboxes allow the user to target the results shown, e.g by entity (Barcode)
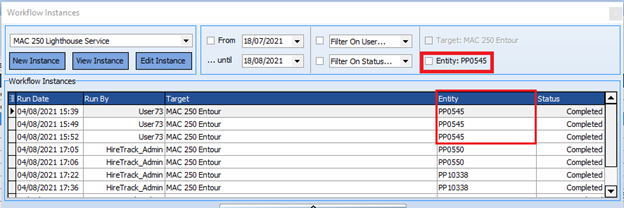
To run a New Instance of the workflow, the user simply clicks on the New Instance button and the workflow is launched.
The View Instance and Edit Instance buttons allow the user to open a previous instance of a workflow in either read-only mode or editable mode respectively.
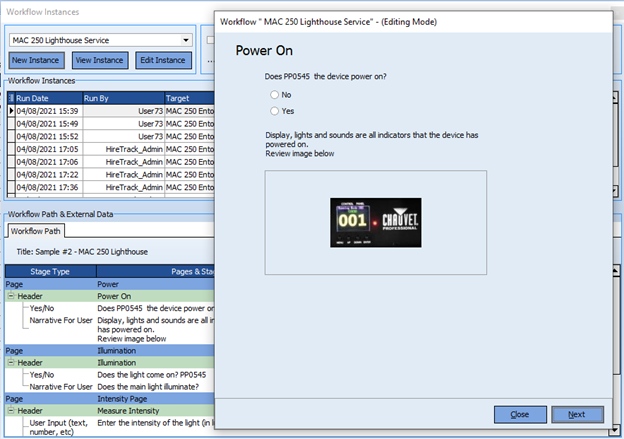
To view a user’s interaction with a Workflow and any outcomes, the workflow path can be viewed in the lower part of the form e.g
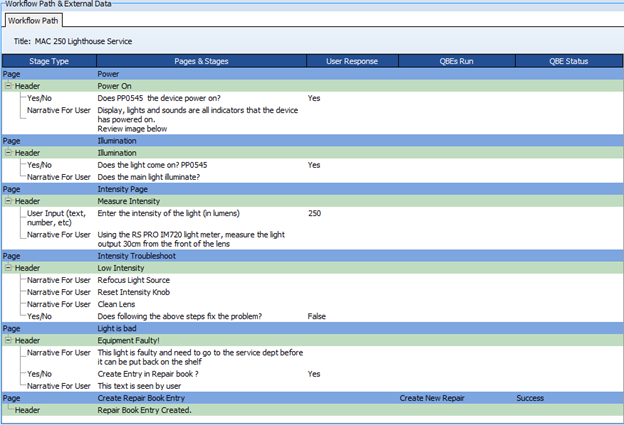
Here the user entered a measured light intensity of 250 lumens, as this is below the value required for this lamp and the user was unable to address the issue, the lamp was “failed” and a QBE was run to automatically create a new entry in the repair book for a technician to investigate further.
Although the above workflow is used to gather data (the intensity of the light), that data is only used with the context of this instance of the workflow, however in some circumstances it maybe that the data gathered needs to be analysed either via the user looking for trends e.g an earth bond starting to fail noticed by the earth resistance increasing, or via a QBE or printed report.
In these scenarios the Workflows designer would have configured the workflow to store “External Data”.
In this scenario an additional tab is displayed to make that data available.
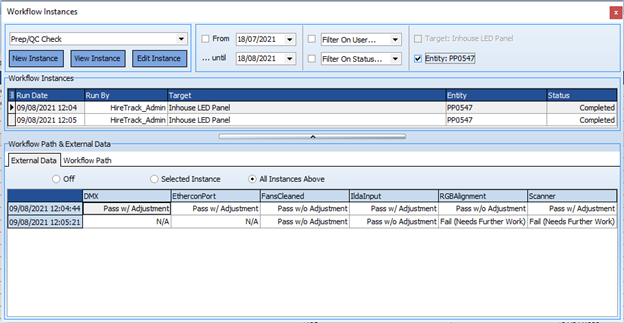
The Column heading displayed are based upon the External Field names created by the Workflow designer. The user can view just the data from the instance selected or can view all Instances.
Comments
0 comments
Article is closed for comments.